Tuesday, January 24, 2012

Pink Himalayan Salt Block-Grilled Top Sirloin Steak and Scrumptious Crab Cakes

Sorry about the brief hiatus. Here I promised you my deeeelish recipe for cooking on a Himalayan salt block, and I left you hanging....I had a bit of unexpected travel and now I am back. So, as a token of my appreciation for your coming back to my blog, I am giving you a two-fer:  One recipe for Salt Block-Grilled Top Sirloin Steak and one recipe for  Scrumptious Crab Cakes. You know what? You can even cook these together for an awesome romantic Valentine's Dinner. Just sayin'.....


Salt Block-Grilled Top Sirloin Steak
Serves 2
If you are not familiar with a Himalayan Salt Block, I suggest spending a few minutes perusing this site as they explain it better than I, and I the salt block that I own came from Salt Works (thanks kids!!!!).  
This block is HOT!!!!! 
The biggest tip I can offer is that you want the meat as dry as possible -- so that you "sear" the steak rather than "steam" it (Steaming will result in a very salty, unpleasant taste.)


Ingredients:
2 Top Sirloin Steaks (or a beef fillet or strip)
1 (8 x 8 x 2 inch) Himalayan Pink Salt block

Directions
  1. Place the Himalayan salt block on a broiling pan and place it onto the middle rack of your oven. Heat the oven to 500 degrees Fahrenheit.
  2. Meanwhile, dry the meat by dabbing paper towels to soak up any moisture, meat blood, etc. Sprinkle the meat with pepper. (Use no salt as the salt block will impart enough salt!!). Set aside while salt block heats.
  3. Heat the  Himalayan  salt block for about 30 minutes. Prepare any other side dishes (e.g., salad, rice) because when the salt block comes out of the oven, you will be ready to cook the beef! I made onion soup so we could eat it while the steak was cooking.
  4. Remove the salt block from the oven and transfer it to a trivet.  
  5. Place your meat on the hot salt block. Sear meat on both sides for about 3 minutes per side (I like my steak medium rare); go for 5 minutes on one side and 3 on the other, if you like it no longer pink.
  6. Remove and serve the meat.
  7. Once the salt block cools completely (after about 2 hours!), rinse it quickly and scrape off any meat residue (I like to use the Pampered Chef scrapers). Dry overnight between two paper towels.

French Onion Soup that we ate while the steak was cooking.
Toasted English Muffins work great if you don't have a baguette! 
Scrumptious Crab Cakes

Serves 2 (with 2 crab cakes for leftovers!)
Ingredients:

  • 1 pound lump crab meat
  • 1 teaspoon parsley
  • 2 teaspoons green onion, finely chopped
  • 1 teaspoon mustard powder
  • 1/4 teaspoon black pepper
  • 2 teaspoons Old Bay™ seafood seasoning
  • 1 tablespoon low fat mayonnaise or low fat sour cream
  • 1 teaspoon Worcestershire sauce
  • 1 egg, lightly beaten
  • 2 Tablespoons of frozen corn (I like Trader Joe's Roasted Corn)
  • Italian seasoned breadcrumbs
  • 1 Tablespoon canola oil
  • 1 Tablespoon unsalted butter


Directions

  1. Preheat oven to 375 degrees F (190 degrees C). Line a baking sheet with foil (makes for easy cleanup!).
  2. Combine crab meat, parsley, green onion, mustard powder, pepper, and seafood seasoning,  mayonnaise, corn, Worcestershire, and egg. Stir together with fork to blend all ingredients. Do not over mix.
  3. Place about 2 Tablespoons bread crumbs in palm of left hand. Add 1/2 cup crab mixture to left palm. sprinkle about 2 more Tablespoons on top and shape mixture into a crab cake using right palm. You want just enough breadcrumbs to help hold the shape.
  4. Repeat for rest of crab meat. This should give you 4 crab cakes. Place onto plate. 
  5. Heat oil and butter in electric skillet to 320 degrees F.
  6. Add crab cakes and cook for about 3 minutes on each side, until lightly browned.
  7. Flip using two spatulas. Cook crab cakes for about 3 minutes on other side.
  8. Transfer to cookie sheet.
  9. Finish baking crab cakes in preheated oven for 15 minutes, until nicely browned.

Enjoy!!!
Next recipe: 3 Mustard Chicken

Tuesday, January 17, 2012

Not Really Leftover Beef Stir-Fry with Bell Peppers

Since my husband and I moved to Maine in July 2011and "officially' became "empty-nesters" (except I guess we flew the coop!), I have become quite adept at scaling back recipes to serve two (or maybe 3-4 if I wanted leftovers). For years, I scaled recipes "up" to feed our family of five plus have enough for friends, in-laws, parents, etc. who so often joined us for dinner. Leftovers seem to have such a negative connotation; there are certainly two camps - those who love them and those who toss them. Just look at this blog. I will admit that I fall in the camp of loving leftovers, however..... I often will create a new recipe to make use of them (hmmm.... so does that still make them leftovers or makeovers?) 
So, where am I going with this? Well, tonight's recipe actually was prepared using leftover (rare) Eye of Round. You can only buy a roast so small.... Recognizing that not everyone has a half roast in their fridge, you can also make this dish using top sirloin. The other awesome tidbit to share is that this dish was on the table in 20 minutes (and that was due to the cooking time of the rice!)


Serves 4 (Cut in half if you abhor leftovers!)


INGREDIENTS

  •          1 pound top sirloin** (about 1/4 - 1/2 inch thick)
  •          Freshly ground black pepper
  •          1 large garlic clove, minced
  •          Olive oil
  •          1 large green bell pepper, sliced into 1/4-inch strips (feel free to also use red and/or yellow peppers)
  •          1 yellow onion, thinly sliced
  •          1 Tablespoon Worcestershire sauce

INSTRUCTIONS


  1. Season the beef with pepper and rub minced garlic over them, both sides. Place the steaks between two sheets of plastic wrap. With a meat pounder, pound the steaks to a 1/4 inch thickness. Cut them across the grain in 1/2-inch wide strips. 
**NOTE: I actually used leftover Eye of Round Roast that I had cooked. The meat was still rare so I was not concerned with it becoming overcooked. I sliced the meat into 1/4-inch slabs, and sliced those again into 1/4-inch strips. This is a great use of leftover roast beef!

2. Heat 2 Tablespoons olive oil in a large skillet on medium high heat. Add the sliced onions and bell peppers, and cook, stirring, for about 2 minutes. (This is just long enough to make them tender but not soggy). Transfer the vegetables to a bowl and cover with aluminum foil or a lid to keep warm.

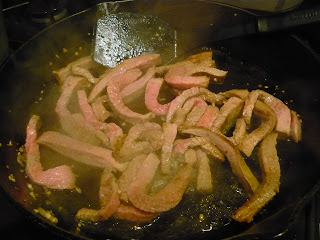
3. Heat an additional 1 Tablespoon of oil in the skillet on medium high heat, for 1 minute. Add the strips of beef and let them brown on one side for 1 minute, then use a spatula to stir them and brown the other side. Cook for another minute (the meat will be medium rare, so keep cooking if you like your beef more well done). Add back the vegetables and add the Worcestershire sauce. Cook for another minute, stirring with a spatula. Serve with steamed rice. (I used Jasmine.) Enjoy!
Tomorrow night: What's cooking? Join me for a meal that I'll be be cooking on my Himalayan salt block. It's fun, unique, hot, and deeee-lish!

Monday, January 16, 2012

Creamy Shrimp Linguine

I'm so excited! This is Day 2 of my new blog. For those just joining, the theme is "never follow a recipe exactly"  because I never do and that is what makes cooking fun!  As I said yesterday in my introductory blog, I hope that the recipes I share over time become part of your repertoire, but that you also feel empowered to change something to make it your recipe. 
Tonight's dish-- Creamy Shrimp Linguine -- is a dish that I pulled together quickly based on what was in the fridge, freezer and pantry. There are a few things I always have on hand: pasta (I AM Italian after all!), olive oil, cheese (of some sort), chicken broth, shrimp and wine. If I had a can of clams or scallops, I probably would have added those too (in step 7). On the EVOO.... we discovered a WONDERFUL artisan olive oil and vinegar store in Bar Harbor. They are open year round and you can order online. I have many recipes that I'll be sharing in which you will see a link to Fiore, but feel free to use your own favorite EVOO.  Sometime, treat yourself to one of theirs. You won't regret it. The one featured here is the Tuscan Herb.


The other thing I should mention about my recipes is that I typically try to use fat-free or low fat whenever I can. My waistline thanks me as does my heart. Finally, I rarely if ever add salt to my recipes. You can always add to your own taste, but I find that the herbs and  other flavors more than compensate for the NaCl, which most of us do not need.
I hope you enjoy it. I look forward to hearing from you.
-- JoAnne


Makes 4 servings.


Ingredients
6 ounces linguine
1/2 cup fat-free chicken broth
1/2 cup low-fat half-and-half
1 Tablespoon cornstarch
2 teaspoons Fiore Herbs de Provence (or your favorite EVOO) plus ~ 1 Tablespoon for a "toss".
1/4 cup chopped onion
2 Tablespoons minced garlic
28 large shrimp
1/2 teaspoon Trader Joe's 21 Seasoning Salute
1/4 teaspoon Cayenne pepper
12 oz. bag of Frozen Vegetables (Broccoli, Yellow Squash, Green Beans, Carrots, Onion, Red Pepper)
1/4 cup sweet vermouth (you can also use a white wine like Riesling)
1/2 cup grated Romano or Parmesan cheese
Fresh parsley
Directions
  1. Bring pasta water to boil in large pot. Cover and reduce heat so water stays at a simmer. 
  2. Toss shrimp in Trader Joe's Seasoning Salute** and Cayenne.
  3. Blend chicken broth, half-and-half, and cornstarch in small bowl.
  4. Increase pasta water to a boil and cook pasta according for about 9 minutes. When 3 minutes are left, add frozen vegetables. Bring back to a boil for 2 minutes. Drain pasta/vegetable mixture, pour back into hot pan, toss pasta with a splash (~ 1 tablespoon) of olive oil, and set-aside.
  5. Heat oil in cast iron skillet on medium high.
  6. Saute onion and garlic for about 2 minutes.
  7. Stir in shrimp.
  8. Stir in broth mixture (from Step 3) and bring to boil. Reduce heat and simmer for about 5 minutes to allow mixture to thicken.
  9. Pre-warm plates (An awesome touch.I like to microwave a stack of 2 for for about 1 minute but you can also place them in a warm oven)  
  10. Serve pasta topped with shrimp in sauce. Sprinkle with cheese and fresh chopped parsley.

** If you don’t have this spice, mix together your own concoction of all (or some) of the following spices: Black Pepper, Celery Seed, Cayenne Pepper, Parsley, Basil, Marjoram, Bay Leaf, dried onion, Oregano, Thyme, Savory, Rosemary, Cumin, Dry Mustard, Coriander, Garlic, Orange Zest, Tomato Granules, Lemon Zest. The “21st ingredient is citric acid which you can leave out!

Sunday, January 15, 2012

Turkey Saltimbocca

The other night, my husband asked how "we" were thinking of preparing the turkey cutlets that he bought for dinner. He suggested a Saltimbocca or Cordon Bleu... and asked if turkey could be substituted for these dishes usually made with veal. No problem!!
Below is the recipe I created -- again, not following any one recipe and using ingredients that I had on hand .  It was delish, easy, on the table in less than 30 minutes, and I have taken efforts to "health-ify" it.  Enjoy!


Turkey Saltimbocca 
Serves 4

Ingredients

1 package (~1 1/2 pounds) turkey breast cutlets
Trader Joe's 21 Seasoning Salute**
4 ounces thinly sliced prosciutto (splurge on top quality, it’s only 4 ounces)
Fresh sage leaves
Flour (~1/2 cup for dredging)
1 tablespoon olive oil
3 tablespoons butter, unsalted, divided
Low-fat Swiss cheese, 2 slices, each cut in half (if you are not a fan of Swiss cheese, use Muenster or Provolone)
1/4 cup fat free chicken broth
1/4 cup dry vermouth (you can also use dry white wine)
Directions
  1. Pre-heat oven to 350o F. 
  2. Place turkey breast cutlets between waxed paper and pound to a thickness of 1/8” to 1/4-inch. 
  3. Season one side of each cutlet with Trader Joe's 21 Seasoning Salute*.
  4. Lay 1 slice of prosciutto on top of each seasoned  turkey cutlet.
  5. Place 1-2 sage leaves on top of each prosciutto slice.
  6. Fold each cutlet in half (on the short end - like closing a book!).
  7. Dredge both sides of each cutlet in flour.
  8. Heat the olive oil in a large cast iron skillet over medium high heat.
  9. Add 2 tablespoons of the butter and melt over medium heat.
  10. Add the turkey cutlets to the skillet and sauté until golden, about 2 to 2 ½ minutes.
  11. Turn the cutlets over and continue to cook the other side until just cooked through and lightly golden, about 2 minutes longer.
  12. Top the cutlets with cheese and transfer them to an oven proof serving platter. Place in oven just long enough to melt cheese (about 5 minutes).
  13. Meanwhile, add the chicken broth and vermouth (or wine) to the hot skillet over medium high heat and simmer about 2 minutes. Whisk in remaining tablespoon of butter and cook until just melted.
  14. Serve the cutlets immediately, with some of the pan sauce drizzled over the top.
** If you don’t have a Trader Joe's near you to get this spice, mix together your own concoction of all (or some) of the following spices: Black Pepper, Celery Seed, Cayenne Pepper, Parsley, Basil, Marjoram, Bay Leaf, dried onion, Oregano, Thyme, Savory, Rosemary, Cumin, Dry Mustard, Coriander, Garlic, Orange Zest, Tomato Granules, Lemon Zest. (The “21st ingredient is citric acid which you can leave out!)

Instructions matter... being creative and resourceful count more


Today is the beginning of a food blog where following instructions matters... but being creative and resourceful count more.  I have always been passionate about food and love cooking for family and friends. Our home in VA was the "go to" place for many holidays, parties, Friday-night gatherings, whatever excuse we could come up with .... to get together and for JoAnne to try out some new dish on company. With our move to Maine this year, I thought my passion might wane. Au contraire! We have enjoyed many family and friend visitors, and the wonderful local foods of Maine -– from lobsters, scallops, and mussels to truly wild blueberries and cranberries,  along with fiddle heads and maple cream -- has only fed that fervor. 

Cooking has been a passion of mine for four decades. I started cooking at the age of 12 (more on that in a later blog). Early on, I made few changes to a recipe. As I became more confident, I would find myself reading scores of recipes in my mother’s cookbook library, trying to find the best recipe – the best experiment to run-- for the dish I was concocting. They all sounded good, so I found myself mixing and matching several recipes, taking the best parts from each (e.g., adding Coca-Cola and mayonnaise to the best ever chocolate cake recipe!). Today is no different, except that I have replaced the hundreds of cookbooks with a Web search and I am a bit bolder (though not cavalier) about trying new recipes on company and making changes if something just doesn't make sense. I have also learned what shortcuts are possible to simplify a recipe (e.g., when you can mix all ingredients at once versus adding each one by one).  

As a former lab scientist, I learned that research rarely went as planned (otherwise, why would they call it “re-search”?).  Indeed, some of the best discoveries were a result of “accidental inventions” (e.g., penicillin. Coke, Teflon, potato chips).  For me, the kitchen has a lot of similarities to a science lab. The ingredients are the “chemicals” and the blending, whipping, creaming, etc. are the “reactions” that must take place to reach the final dish (the “test results are in”). 

Through the years that I have been cooking, there have been some accidental inventions that were the result of spontaneous tweaks and substitutions. It is these recipes that have become “keeper” dishes that I want to share in the hope that they become part of your cooking repertoire. My hope is even greater that you learn to use them as a guide and have the gumption to try something different or new… because you were missing an ingredient or just because the culinary “fire in your belly” said I dare you. I hope my passion for cooking helps others learn how to cook creatively and not be afraid to deviate from the instructions on a recipe.   

I’m always happy to hear from you, so don’t hesitate to get in touch with me at maineiacmommy@gmail.com. I encourage you to ask questions and post comments about dishes you are particularly interested in learning to master.


And with that....I'll leave you with this fitting quote:
“Cooking requires confident guesswork and improvisation-- experimentation and substitution, dealing with failure and uncertainty in a creative way” 
― Paul TherouxSir Vidia's Shadow: A Friendship Across Five Continents

Jo Anne